
Trying out ReactJS with the Marvel API
May 26, 2014
I’ve recently started looking into ReactJS (Facebook’s front-end JavaScript library) for building web UIs. React has an interesting philosophy about how the UI should function and be defined. First off, while many frameworks have an entire system for interacting with the server, routing, etc, React is just the View portion (in a MV* application). Second, React does not employ 2-way data binding. Instead, it uses a one-way data flow where data is maintained in the parent items and is manually shared to its child components. Finally, React uses a Virtual DOM which they say helps with performance (I cannot speak to this first-hand but it seems logical — see here for more on React’s performance from someone who can speak more authoritatively on this).
One other thing that jumped out at me about React is how they recommend you build your UI. According to the documentation, you should start out with a design/mock-up and build a static version of the application. Once the static version is complete, figure out which components are available and how data should flow. Finally, toss your real data into your UI. See Thinking in React for more information on this.
The App
I generally like to have a goal in mind when learning a new language or framework (this goal doesn’t necessarily have to be useful). It was determined that working with the Marvel API would be a good way to test the framework since I wouldn’t have to write a fake API first — plus it seemed fun :)
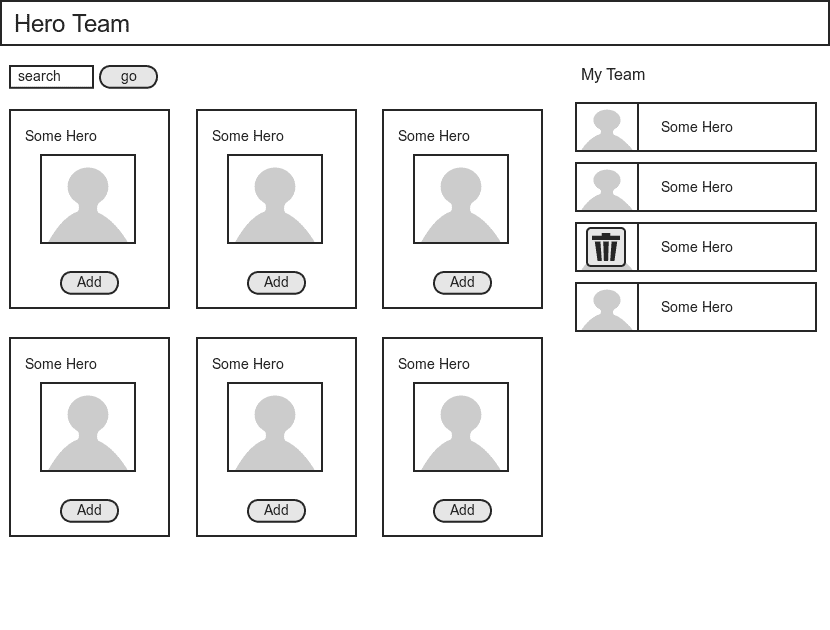
The application should let a user search through the Marvel characters API and allow for the assembling of a team. The team members can later be removed from the list. We’re keeping it pretty simple for this example (wire-frame below).
Disclaimer: This was my first quick foray into using React. There is likely a better way to do some of the things I will be walking through here. Additionally, I know almost nothing about comic books so please don’t laugh that you can build a “Hero Team” out of heroes and villains, etc. (worst example ever).
Setup
Before we really get going, we need to perform some initial, setup tasks. As a side note, if you want to skip all this and head right to the code — it’s available here.
- Obtain a Marvel API key at http://developer.marvel.com/
- Add some version of Localhost to the referrers section on the Marvel website (we will need this for testing).
- Create some jQuery methods for interacting with the Marvel Character’s API (see developer.marvel.com for more on the specifics of the API).
- Add your public key as a JavaScript field named key. Something like
window.key = "___________"; //this is your public key - Create an HTML page and load the required scripts/styles
<link href="//netdna.bootstrapcdn.com/bootstrap/3.1.1/css/bootstrap.min.css" rel="stylesheet">
<link href="styles/site.css" rel="stylesheet">
<script src="http://fb.me/react-0.10.0.js"></script>
<script src="http://fb.me/JSXTransformer-0.10.0.js"></script>
<script type="text/javascript" src="http://ajax.googleapis.com/ajax/libs/jquery/1/jquery.min.js"></script>
Notice we are including the React files. Also of note, for this example we’re simply loading everything from the CDN’s without a local fallback.
Determine Component Architecture
Taking a look at the wire-frame included above, we want to come up with what React components we will need. Each component should be responsible for it’s own content so there should ideally be little overlap. Additionally, as mentioned above, we are using a one-way data flow — we want to design our components as children of a main component.
- HeroBox: HeroBox is the container for everything we will be creating with React (the Search / Search Results / Current team). If we take a look at our wire-frame, it consists of pretty much everything but the header section.
- Hero: This is the individual Hero item.

- HeroList: A list of the possible HeroItems (this is the left side of the HeroBox).
- HeroForm: The search form.

- CurrentTeam: The container for all of the Heroes / Villains in our current team.
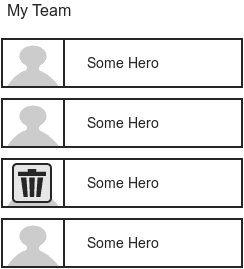
- CurrentTeamItem: An individual Hero/Villain partial that will be displayed in our CurrentTeam container.

Since HeroBox is the parent of all the other components, it will be the component that owns the state of our application. That is, everything will get its data from HeroBox and will write back to HeroBox if it needs to change the data.
React Components
We will need to start out by creating an intial React Component. To do that we can simply say var someComponent = React.createClass({ ... });. This React class, can contain custom methods / properties or override some of the default React methods. One of these default methods is the render() method which will build the DOM elements for the component. In our example we will be using JSX as the output of our Render method. JSX is simply a JavaScript XML syntax transform — what that means for us is that we can practically write HTML as the output of a render method. For example:
var someComponent = React.createClass({
  render: function(){
	return(
		<h1>Hello</h1>
	)
  }
});
When someComponent is rendered it would unsurprisingly write out <h1>Hello</h1> to the document. This is a bit basic for our example but the concept is necessary.
HeroBox
The HeroBox will be the first component we create because all of the other components will obtain it’s data through it. We will be spending the most time on this component because most of the React-specific stuff is occuring here (the code for this component is posted in its entirety while we will just highlight the interesting parts of the other components).
var HeroBox = React.createClass({
	loadHeroes: function(){
		getCharacters().then(function(data){
			this.setState({data:data.data.results});
		}.bind(this));
	},
	loadHeroByName: function(name){
		getCharacters("?nameStartsWith=" + name).then(function(data){
			this.setState({data: data.data.results, currentTeam: this.state.currentTeam});
		}.bind(this));
	},
	addToTeam: function(item){
		this.state.currentTeam.push(item);
		this.setState({data:this.state.data, currentTeam: this.state.currentTeam});
	},
	getInitialState: function(){
		return{ data: [], currentTeam: []};
	},
	delete: function(item){
		this.state.currentTeam.splice(item, 1);
		this.setState({data: this.state.data, currentTeam: this.state.currentTeam})
	},
	componentWillMount: function(){
		this.loadHeroes();
		//this.loadHeroByName("Ajaxis");
	},
	render: function(){
		return(
			<div className="heroBox row">
				<div className="col-md-8">
					<HeroForm onSearchSubmit={this.loadHeroByName} onCancel={this.loadHeroes}/>
					<HeroList data={this.state.data} addToTeam={this.addToTeam} />
				</div>
				<div className="col-md-4 teamWrapper">
					<CurrentTeam data={this.state.currentTeam} delete={this.delete} />
				</div>
			</div>
		)
	}
});- loadHeroes: method for obtaining a list of heroes starting at the first location in the Marvel API (if we were including pagination, this call would be used for browse functionality). Take special note of the setState method. We are using this method to trigger the UI updates (see React documentation on setState for more information)
- loadHeroByName: Calls our jQuery method for interacting with the Marvel data with a given hero name
- addToTeam: Adds a record to the current team State and calls setState (see description on setState).
- getInitialState: Define the initial state of the component — be careful with this method on non-root components
- delete: Remove a given item (by index) from the current team and re-render the component.
- componentWillMount: This is a method that is invoked immediately before the rendering occurs. This is one of the methods I was a little iffy about as far as how I’m using it but it seems okay due to the demos.
- render: The render method is simply the JSX representation of how we want to render this component. You may notice we’re using some elements that are not valid DOM elements, such as HeroForm / HeroList / CurrentTeam. These are elements we will be defining below. The attributes on the elements are how we are passing the properties from the HeroBox to the rest of the components.
HeroList
With this component we want to parse through the list of data from HeroBox and create a Hero component for each item. Additionally, this component should serve as the middle man between events on the HeroComponent and the HeroBox component.
var HeroList = React.createClass({
	addToTeam: function(item){
		//basically a passthru
		this.props.addToTeam(item);
	},
	render: function(){
		var that = this;
		var nodes = this.props.data.map(function(hero, index){
			return <Hero key={index} name={hero.name} thumbnail={hero.thumbnail} description={hero.description} addToTeam={that.addToTeam}></Hero>;
		});

		return <div className="heroList">{nodes}</div>
	}
});
In this component we are using this.props.____ to access properties that were passed in from the render method on HeroBox. The render method of HeroBox contains <HeroList data={this.state.data} addToTeam={this.addToTeam} /> — this means we have this.props.addToTeam and this.props.data as available options here. The render function may look a little strange but it is basically iterating through our list of items and returning a Hero component for each one.
Hero
As we saw above, the parent component of this item defines what properties we have available. Since the Hero item is rendered as <Hero key={index} name={hero.name} thumbnail={hero.thumbnail} description={hero.description} addToTeam={that.addToTeam}></Hero>, we have key, name, thumbnail, description and an addToTeam method available on the object’s props. The Hero component is mostly just rendering out the properties, however, it is also handling button clicks.
var Hero = React.createClass({
	...
	handleClick: function(){
		var image = this.getImage();
		this.props.addToTeam({name: this.props.name, image: image })
	},
	render: function(){
		return (
			<div className="hero col-md-3">
				...
					<button type="button" className="addToTeam btn btn-primary" onClick={this.handleClick}>Add To Team</button>
				...
			</div>
		);
	}
});
What’s happening when a user clicks on the “Add to Team” button is the onClick method, handleClick is called. From there, the handleClick method calls the addToTeam method from the HeroList which calls the addToTeam method on the HeroBox. The HeroBox method runs the setState function so our UI is kept up-to-date. This may seem like a lot of work to update the UI but its nice how clear and non-magical this is.
HeroForm
Similar to Hero, we’re mostly calling functions back on the HeroBox from this Component. We will call loadHeroByName (which is what is performing our search against the API) when the user submits the form and loadHeroes when the user presses cancel (for the sake of example — there is not a lot of the standard logic that should go on in reseting form states, etc).
var HeroForm = React.createClass({
	handleSubmit: function(){
		var name = this.refs.name.getDOMNode().value.trim();
		this.props.onSearchSubmit(name);
		this.refs.name.getDOMNode().value = '';
		return false;
	},
	handleCancel: function(){
		this.props.onCancel();
	},
	render: function(){
		return (
			<form className="searchForm row form-inline" onSubmit={this.handleSubmit}>
					<input type="text" className="form-control" placeholder="Enter a Hero name" ref="name" />
					<input type="submit" value="Search" className="btn btn-primary" />
					<button type="button" className="btn" onClick={this.handleCancel}>Clear Results</button>
			</form>
		);
	}
});
This is all pretty standard to what we’ve seen so far except for the getDOMNode() and this.refs in the handleSubmit function. These statements are allowing us to interact with the data in the form. For more on this, see React’s documentation on the subject.
CurrentTeam / CurrentTeamItem
We are not going to go into detail on the Team Components — they are simply using the same techniques we’ve already encountered on the other Components. Please check out the project on GitHub for the code.
Finishing Up
Now that the components are created we need to write out our HeroBox component to the page.
index.html
<body>
	...
	<div id="content" class="container-fluid"</content>
	<script type="text/jsx" src="scripts/heroes.js"</script>
</body>
heroes.js
React.renderComponent(
	<HeroBox />, document.getElementById('content')
);
Be sure to take a look at code for this project on GitHub.

Hi 👋 I'm Ryan Lanciaux. I run Spaceship Studio, LLC. a consultancy specializing in fast and dynamic web and native mobile applications.
I live in Ann Arbor with my wonderful family! In my freetime, I create electronic music.